自分の為のメモその3(一応、終わり)。
- 今回
- 静的サイトジェネレーターHugo
- ソースコードバージョン管理ツールGit
- キーボードリマップ(再割り当て)ツール input-remapper
- GoogleChromの拡張機能LINEを使い易くする
- Google Driveをインストールする
- メール管理アプリThunderbird
- Sublime-Music
- 音質設定
- Dropbox
- モニター別に倍率を設定する
-
- ディレクトリを日本語から英語に
- AppImage管理
- apt以外のアプリ管理インストール
snapd - apt以外のアプリ管理インストール
flatpak nvim- 検索、クリップボード、ツール系(
ripgrep、xsel、fzf、deno、rust、go
-
- ターミナル
- フォント
- BashからZshに
- Firefox
- SKK
静的サイトジェネレーターHugo
静的サイトジェネレーター Hugoをインストールする。というか、バージョンを揃えておかないと、バージョンも生成HTMLに含まれているので差分となってしまう。
cp ~/Nextcloud/Public_Ubuntu/hugo_0.111.3_Linux-64bit.tar.gz ~/.local/bin
cd ~/.local/bin
tar -zxvf  hugo_0.111.3_Linux-64bit.tar.gz
rm LICENSE README.md
hugo version
rm hugo_0.111.3_Linux-64bit.tar.gz
Amazon S3などのAWSのサービスをコマンドで使用するための AWS CLIをインストールする。
cd
curl "https://awscli.amazonaws.com/awscli-exe-linux-x86_64.zip" -o "awscliv2.zip"
unzip awscliv2.zip # 7z x awscliv2.zip
sudo ./aws/install
aws configure
アップデートする場合はsudo ./aws/install --bin-dir /usr/local/bin --install-dir /usr/local/aws-cli --update
ソースコードバージョン管理ツールGit
# sudo apt install git 代替インストールされているがなければ
git config --global user.name exampleuser
git config --global user.email example@mailserver.com
git config --global core.editor nvim
git config --global url.git@github.com:.pushInsteadOf https://github.com/
mkdir ~/.ssh
~/.ssh/config
Host server
    HostName server
    User user
    IdentityFile id_rsa
    Port 22
    IdentitiesOnly yes # IdentityFile で指定した秘密鍵でのみ認証を試みる
Host github github.com
    HostName github.com
    IdentityFile id_rsa_github
    User git
    Port 22
    IdentitiesOnly yes # IdentityFile で指定した秘密鍵でのみ認証を試みる
    Compression yes # Git でのファイル転送時に圧縮する
秘密鍵格納ディレクトリの権限を変更する
sudo chmod 600 ~/Nextcloud/Public_Ubuntu/server/key/id_rsa
sudo chmod 600 ~/Nextcloud/Public_Ubuntu/server/key/id_rsa_github
sudo chmod 600 ~/.ssh/config
ssh -T git@github.com
キーボードリマップ(再割り当て)ツール input-remapper
Releases · sezanzeb/input-remapper · GitHubをインストール。 Releasesから deb ファイルダウンロードしてインストールした方が楽。1
ビルドする場合
sudo apt install git python3-setuptools gettext
git clone https://github.com/sezanzeb/input-remapper.git
cd input-remapper && ./scripts/build.sh
sudo apt install ./dist/input-remapper-1.5.0.deb
となるが、ベータも下りてくるようで注意。
GoogleChromの拡張機能LINEを使い易くする
GoolgeChomeの拡張機能LINEを単体で起動できるようにして、デスクトップファイルも作成するということ。2
chrome://extensions/- デベロッパーモードをONにする
- IDをコピー
chrome-extension://英字32文字のID/index.html- その他のツール -> ショートカットを作成…
-
- ウィンドウとして開く
cd $HOME/.local/share/applicationsls -lt# ショートカット作成したばかりなので一番上のはず。アプリIDを確認- LINE APP ICON GUIDELINEでアイコン画像ダウンロード
mv LINE.png ~/.local/share/icons/hicolor/128x128/apps/LINE.png- chrome-アプリID-Default.desktop を編集してアイコン画像を上の移動先に編集
chrome-extension://ophjlpahpchlmihnnnihgmmeilfjmjjc/index.html
mkdir -p ~/.local/share/icons/hicolor/128x128/apps/
cp ~/Nextcloud/Public_Ubuntu/LINE.png ~/.local/share/icons/hicolor/128x128/apps/
~/.local/share/applications/chrome-pbpoojghcbigbheeamegjbdailkaeglf-Default.desktop
- Icon=chrome-pbpoojghcbigbheeamegjbdailkaeglf-Default
+ Icon=/home/arimasou16/.local/share/icons/hicolor/128x128/apps/LINE.png
この時、flatpak版GoogleChromeをインストールしていると、 5 当たりでショートカットの作成などが出来なかったはず。
Create shortcuts not working even with extra permissions · Issue #91 · flathub/com.google.Chrome · GitHub
ついでに、GoogleChromeをインストールすると、その他の拡張機能のデスクトップファイル(例えばZoomとか)も作成されて鬱陶しいからchrome-extension://ophjlpahpchlmihnnnihgmmeilfjmjjc/index.html 以外削除しても良い
Google Driveをインストールする
GNOMEデスクトップならば設定 -> @オンラインアカウントでGoogleにログインすれば、そのままファイルマネージャー、Files(旧Nautilus)に統合されて使えるようになる。が、そうでないデスクトップの場合、
astrada/google-drive-ocamlfuseを使うのが楽だ。3
sudo apt install opam -y
opam init
opam update
opam install depext
eval $(opam env)
opam depext google-drive-ocamlfuse
nvim ~/.zshrc
export PATH="$HOME/.opam/default/bin:$PATH"
opam install google-drive-ocamlfuse
google-drive-ocamlfuse
mdkir ~/GoogleDrive
google-drive-ocamlfuse ~/GoogleDrive
メール管理アプリThunderbird
デフォルトでインストールされているケースが多いと思うが、インストールされていなかったり、最新版でない場合4
$ ls -l /usr/bin/thunderbird
-rwxr-xr-x 1 root root 10758  8月 14  2021 /usr/bin/thunderbird
$ 7z x thunderbird-102.5.0.tar
$ tar xjf thunderbird-*.tar.bz2
$ sudo rm /usr/bin/thunderbird
$ sudo ln -s /opt/thunderbird/thunderbird /usr/bin/thunderbird
$ rm -rf ~/.thunderbird
アドオンは
tbkeysをインストールしておく5。
Muttator亡き今、これ一択。何故かThunderbirdアドオン検索からは一部機能が制限されたtbkeys-liteしかインストールできないので
Releases · wshanks/tbkeys · GitHubから xpi ファイルをダウンロードする。
Sublime-Music
今は jeffvli/sonixdを使ってるのでインストールすることはなくなった。一応残しておく。
sudo apt install sublime-music
もしくは
pip install sublime-music
pip install sublime-music\[keyring,chromecast,server\]
wget https://gitlab.com/sublime-music/sublime-music/-/raw/master/sublime-music.desktop
mv sublime-music.desktop ~/.local/share/applications/sublime-music.desktop
wget https://gitlab.com/sublime-music/sublime-music/-/raw/master/logo/icon.png
mv icon.png ~/.local/share/icons/hicolor/256x256/apps/sublime-music.png
sudo update-desktop-database
OSError: Cannot find libmpv in the usual places. Depending on your distro, you may try installing an mpv-devel or mpv-libs package. If you have libmpv around but this script can't find it, consult the documentation for ctypes.util.find_library which this script uses to look up the library filename.
と表示された場合はsudo apt install libmpv-devをする。
音質設定
音質向上アップ狙うなら、ただ馬鹿耳なのとへっぽこLinux使いで下手なことしない方がいいかな。たまにリポジトリーパッケージの競合が起きたりする。
sudo apt install linux-lowlatency
#sudo apt install linux-image-rt-amd64 Debian系
とは言え、 Ubuntuのリアルタイムカーネルの一般提供、Ubuntu 23.04(lunar)の開発 / rsyslogのAppArmorによる制御 | gihyo.jp とあるので、今後はもっと気軽に安定して使用できるようになるのかも(なってるのかも)知れない。
ハイレゾ仕様にしたい場合、以下の設定変更してみたが、本当に音が良くなっているのか自信ない。表示される数値は変わった。しかし、 Ubuntu 22.10 その10 - PulseAudioからPipeWireへ移行・PipeWireはPulseAudioを置き換える - kledgebなので、今後はこのやり方は使えない。
/etc/pulse/daemon.conf
; resample-method = speex-float-1
resample-method = speex-float-5
; default-sample-format = s16le
default-sample-format = s24le
; default-sample-rate = 44100
default-sample-rate = 96000
これも効果あるかいまいち、確証がないが、bluetoothの接続で A2DP にならない場合。 /etc/pulse/default.pa
- load-module module-bluetooth-policy
+ load-module module-bluetooth-policy auto_switch=false
上記変更したら、pulseaudio -kして再起動させる。
もし デスクトップ版Amazon Music(Windows)をインストールして、ULTRA HDで再生したいなら、
flatpak install flathub com.usebottles.bottles
として Easily run Windows software on Linux with Bottles! ⋅ Bottlesをインストールする。
文字化けを解消するために、allfont、cjkfontをbottoles上でインストールしてから
cp ~/Nextcloud/Public_Ubuntu/installer/toku4/Replace_JP.reg ~/.var/app/com.usebottles.bottles/data/bottles/bottles/applications/drive_c/users/arimasou16
詳細とユーティリティー -> ユーティリティ -> レジストリエディターから 日経Linux 2022年7月号の付録のレジストファイルをインポートする。
update.ini(fileformatはdos、改行は\r\n)
[Update]

debuglevel=4
起動時のエラーを無くすために設定ファイル update.ini を配置する。
cp ~/Nextcloud/Public_Ubuntu/installer/update.ini ~/.var/app/com.usebottles.bottles/data/bottles/bottles/applications/drive_c/users/arimasou16/AppData/Local/Amazon\ Music/
などする。
ただ、最近、ハイレゾ云々に拘ることに意味を感じなくなってきて、軽くて安定している Spotify Premiumを使っている。まぁ、Amazon Premium会員だと、Amazon Musicの方が安いですけどね。ちょっとUIとかいけてないし、Google Homeとの連携も出来ない(Google Castすれば再生可)。
# snap install spotify snapはこちら
# flatpak install flathub com.spotify.Client flatpakはこちら
curl -sS https://download.spotify.com/debian/pubkey_7A3A762FAFD4A51F.gpg | sudo gpg --dearmor --yes -o /etc/apt/trusted.gpg.d/spotify.gpg
echo "deb http://repository.spotify.com stable non-free" | sudo tee /etc/apt/sources.list.d/spotify.list
sudo apt-get update && sudo apt-get install spotify-client
/usr/share/applications/spotify.desktop6
- Exec=env BAMF_DESKTOP_FILE_HINT=/var/lib/snapd/desktop/applications/spotify_spotify.desktop /var/lib/snapd/snap/bin/spotify %U
+ Exec=env BAMF_DESKTOP_FILE_HINT=/var/lib/snapd/desktop/applications/spotify_spotify.desktop /var/lib/snapd/snap/bin/spotify --force-device-scale-factor=2.0 %U
Dropbox
クラウドストレージサービスの第一人者、 dropboxのクライアントアプリをインストールする。意外とLinux用を用意しているクラウドサービスって無いものである。
cd ~ && wget -O - "https://www.dropbox.com/download?plat=lnx.x86_64" | tar xzf -
~/.dropbox-dist/dropboxd
ただ、最近、どうもインストールが上手くいない(起動しない)ってことが多いんだよね。こちらも flatpak版Dropboxがあるので、最近はこちらを使っている。公式らしい7。
モニター別に倍率を設定する
デュアルモニター環境が当たり前になりつつあるが、GNOME環境でデュアルモニター環境にしたところ、同じ倍率しか設定できないので、マジかと思ったら、以下のような回答を得られた。
gsettings set org.gnome.mutter experimental-features "['x11-randr-fractional-scaling']"
gsettings set org.gnome.mutter experimental-features "['scale-monitor-framebuffer']"
本当は、ワークスペースも別々に移動したいんだけど、その場合、GNOMEデストップ設定-> Desktop -> ワークスペースから、
-
multi-monitor Behavior
- Workspaces on Primary Display Only
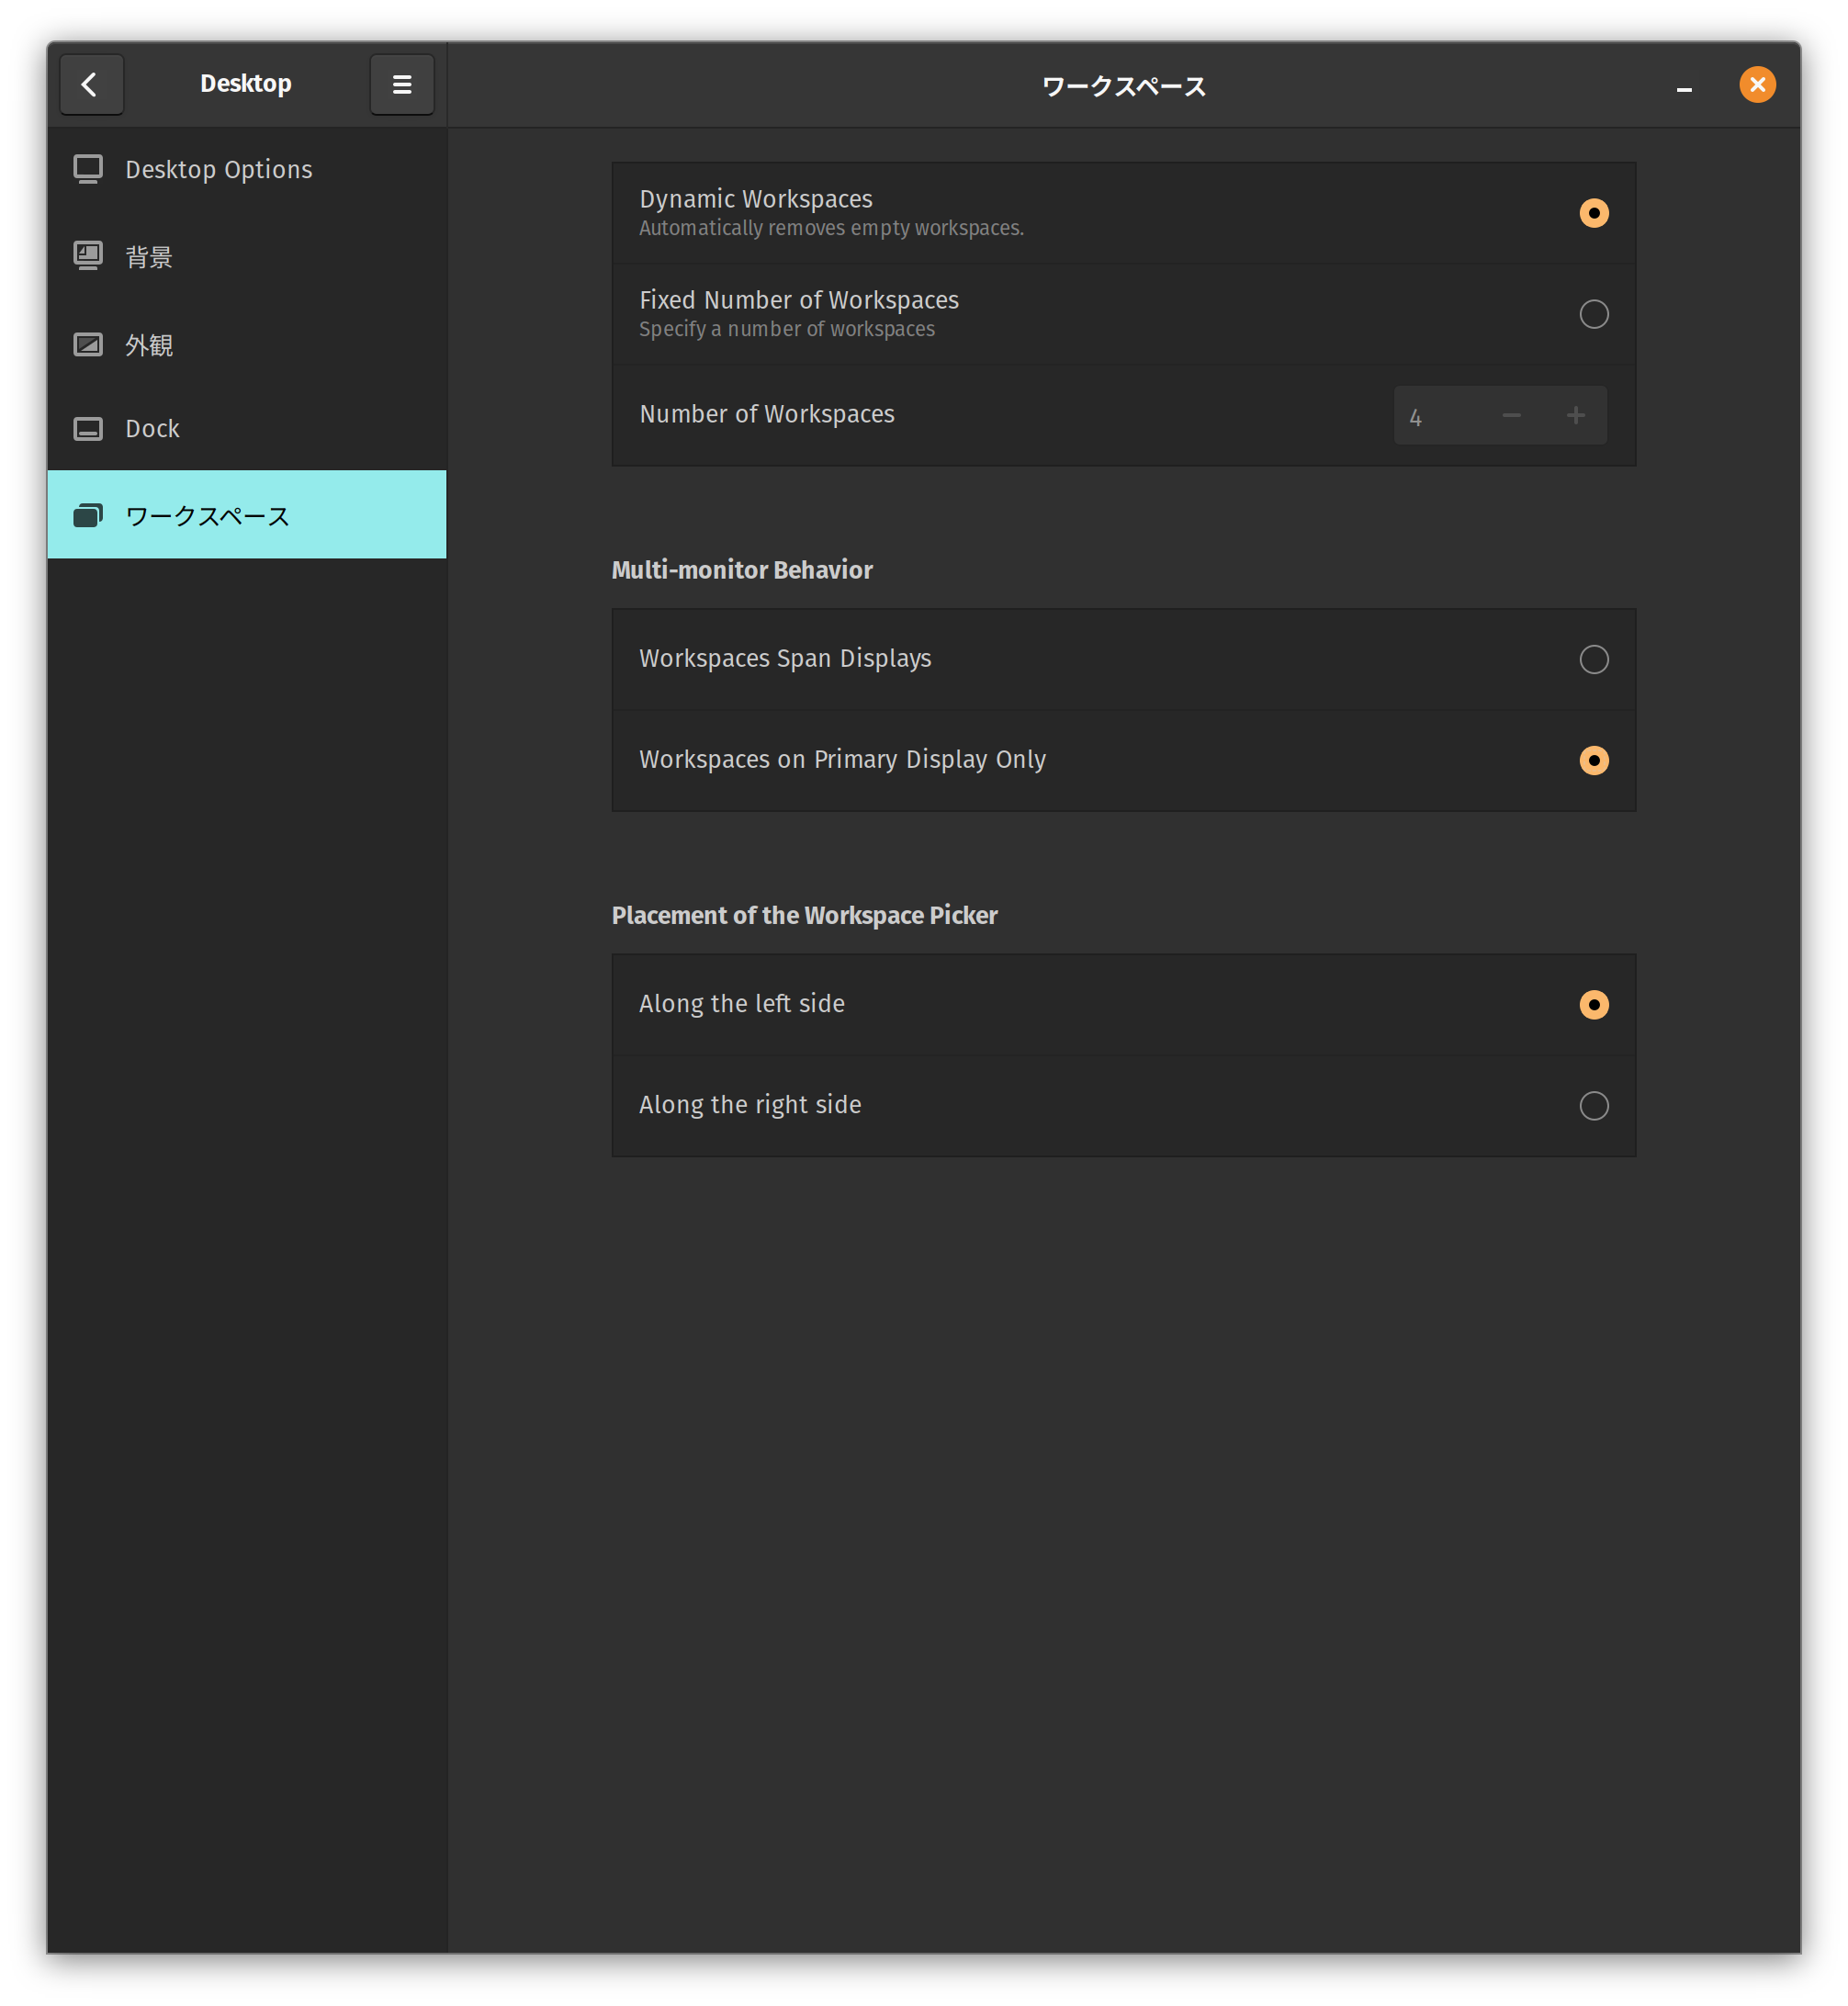
として複数モニターでの振舞いを第一優先ディスプレイだけワークスペースにする、とすればワークスペース切り替えを片側だけ、というか第一優先ディスプレイだけになる。ただし、この場合、ワークスペースも第一優先ディスプレイだけとなる。
ってな感じで以上である。クラウドノートエディターにメモっておいた内容だけど、そのクラウドノートエディターをインストールするまでがひと手間だったり準備が必要だったりするので、自分のブログに記しておく。
-
Linux環境だからってもうキーボードのキーリマップ(再割り当て)に悩まない。GUIでイケるinput-remapperにも記載。 ↩︎
-
Muttator、Dorando keyconfigの代替となる?Thunderbird 68以後もキーバインド変更可能なMailExtensions形式アドオンtbkeys ↩︎
-
snap版だと /var/lib/snapd/desktop/applications/spotify_spotify.desktop flatpak版は ~/.local/share/flatpak/app/com.spotify.Client/current/active/files/share/applications/com.spotify.Client.desktop となる。 ↩︎
-
Official Dropbox Flatpak for Linux on Flathub - Dropbox Communityとある。 ↩︎